源码系列
# 源码系列
# 1.jquery源码
jquery的v3.4.1版本:jquery源码 (opens new window)
- 核心模块
自执行匿名函数-防止与其他代码冲突和污染全局环境,外不能访内,内可以访外
(function(global, factory){
})(typeof window !== "underfined" ? window: this, function(window, noGlobal){
});
1
2
3
2
3
问题:外界如何访问到源码内的函数?
外部暴露访问-浏览器环境下,把$ 和 jQuery函数挂载到window上,在外界就可以访问到$和jQuery了
if ( !noGlobal ) {
	window.jQuery = window.$ = jQuery;
}
// 其中`noGlobal`参数只有在这里用到
1
2
3
4
2
3
4
# 2.axios拦截器源码
使用
//添加请求拦截
axios.interceptors.request.use(function (config) {
 // 做些请求拦截
 return config;
  }, function (error) {
 // 请求未发送,发生错误
 return Promise.reject(error);
})

// 添加响应拦截
axios.interceptors.response.use(function (response) {
 //响应状态码是2xx时,做的响应拦截
 return response;
  }, function (error) {
 // 响应状态码是2xx时,做的响应拦截
 return Promise.reject(error);
})
1
2
3
4
5
6
7
8
9
10
11
12
13
14
15
16
17
2
3
4
5
6
7
8
9
10
11
12
13
14
15
16
17
源码:InterceptorManager.js
- axios 把用户注册的每个拦截器构造成一个 promise.then 所接受的参数,把相对应的拦截器数组进行调用链的头部和尾部组装,在运行时把所有的拦截器按照一个 promise 链的形式以此执行,
- use方法的作用就是将处理函数封装成一个处理对象放到拦截器数组(handlers)里。拦截器的use方法,分别传三个参数,其中fulfilled和rejected参数传入promise.then()中,是一个函数方
'use strict'

var utils = require('./../utils')

//handlers数组存放拦截器任务对象
function InterceptorManager() {
 this.handlers = [];
}

/**
 * 拦截器任务,返回拦截器任务数组中的索引,以方便移除
 *
 * @param {Function} fulfilled The function to handle `then` for a `Promise`
 * @param {Function} rejected The function to handle `reject` for a `Promise`
 *
 * @return {Number} An ID used to remove interceptor later
 */
InterceptorManager.prototype.use = function use(fulfilled, rejected, options) {
 this.handlers.push({
 fulfilled: fulfilled,
 rejected: rejected,
 synchronous: options ? options.synchronous : false,
 runWhen: options ? options.runWhen : null
  });
 return this.handlers.length - 1;
};

/**
 * 移除拦截器任务对象,根据拦截器任务的索引,将对象变为空
 *
 * @param {Number} id The ID that was returned by `use`
 */
InterceptorManager.prototype.eject = function eject(id) {
 if (this.handlers[id]) {
 this.handlers[id] = null;
  }
};

/**
 * axios提供遍历拦截器的方法,主要目的是将handlers数组为null的项跳过执行
 *
 * @param {Function} fn The function to call for each interceptor
 */
InterceptorManager.prototype.forEach = function forEach(fn) {
 utils.forEach(this.handlers, function forEachHandler(h) {
 if (h !== null) {
 fn(h);
   }
  });
};
module.exports = InterceptorManager;
1
2
3
4
5
6
7
8
9
10
11
12
13
14
15
16
17
18
19
20
21
22
23
24
25
26
27
28
29
30
31
32
33
34
35
36
37
38
39
40
41
42
43
44
45
46
47
48
49
50
51
2
3
4
5
6
7
8
9
10
11
12
13
14
15
16
17
18
19
20
21
22
23
24
25
26
27
28
29
30
31
32
33
34
35
36
37
38
39
40
41
42
43
44
45
46
47
48
49
50
51
过程:

# 3.vue-router源码
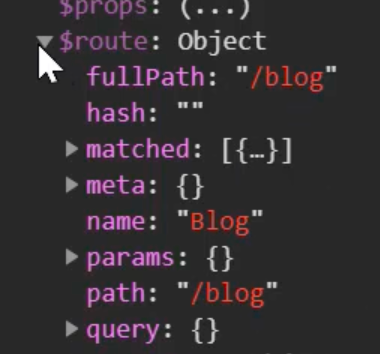
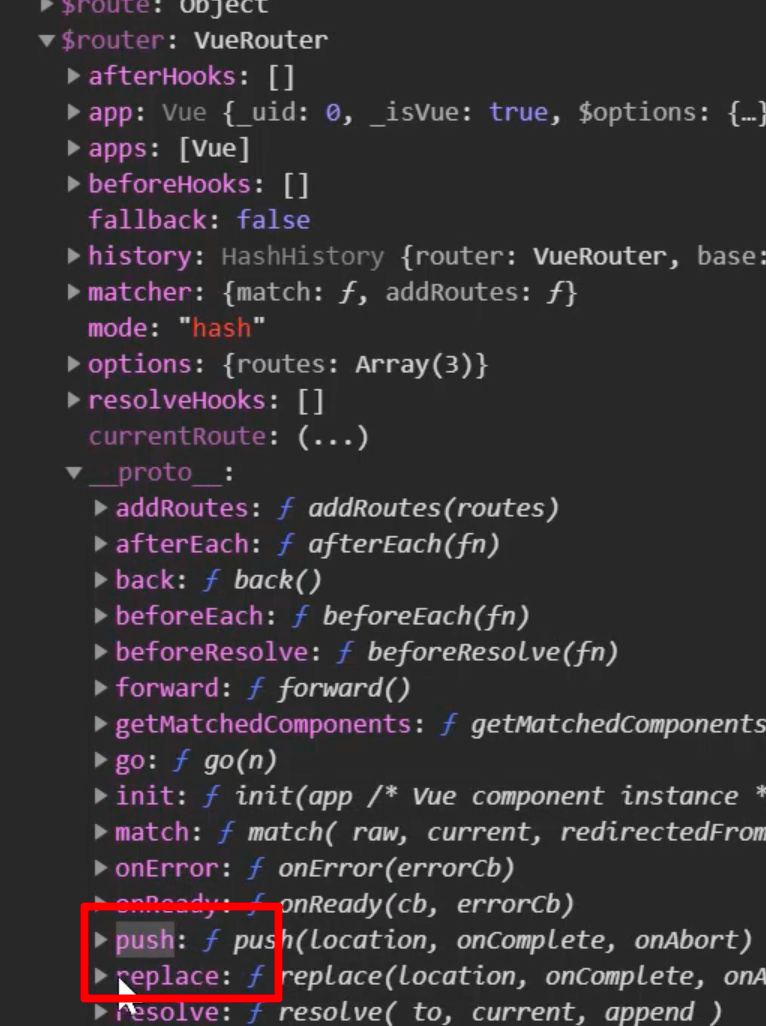
- new Vue创建实例中加入router对象时,会注入$route和$router两个属性
- $route—路由规则—meta,query
- params传参不在地址栏显示,query传参在地址显示,所以尽可能多用params

- $router—路由对象
- push(会记录历史)
- replace(不会记录历史)
- go方法—go(-1),上一个页面,go(-2),上上一个页面
- 获取指定的订单
{
    path: '/detail:id',
    name: 'detail',
    // 在组件中通过props来接受url参数
    props: true
}
// 获取id
// 组件内
props:['id'], {{id}} //不再依赖路由规则推荐
// 指定路由
this.$route.params.id //强依赖于路由,必须要有路由传递相应的参数
1
2
3
4
5
6
7
8
9
10
11
2
3
4
5
6
7
8
9
10
11
- 模式
- Hash: /#/—基于锚点,触发onhashchange事件—默认
- History: / —服务端配置支持,基于html5的history api
- history.pushState—实现客户端路由—>ie10
# 4.如何打造一个自己的脚手架mycli?
简单的流程
- npm init -y创建一个项目
- 在package.json配置bin为"bin": "bin/test",
- 在test.js首行加入#! /usr/bin/env node,后面加入console.log("hello world");
- 运行npm link,至全局
- 命令行成功打印出 hello world